The “Viewpoint” is the position from which you, the viewer, sees the view.
When you look at an image you can usually tell instinctively, how high the viewpoint is. For example, if the viewpoint is high in a landscape then you might well see on top of buildings. , whereas if the viewpoint is low (as it might be if you were lying down or crouched) you might not be able to see the top of a windowsill.
As I wrote that last sentence I realised that I didn’t have any images to illustrate the point so I dashed into the garden and photographed the bird bath that all birds have very carefully ignored completely……the little tinkers.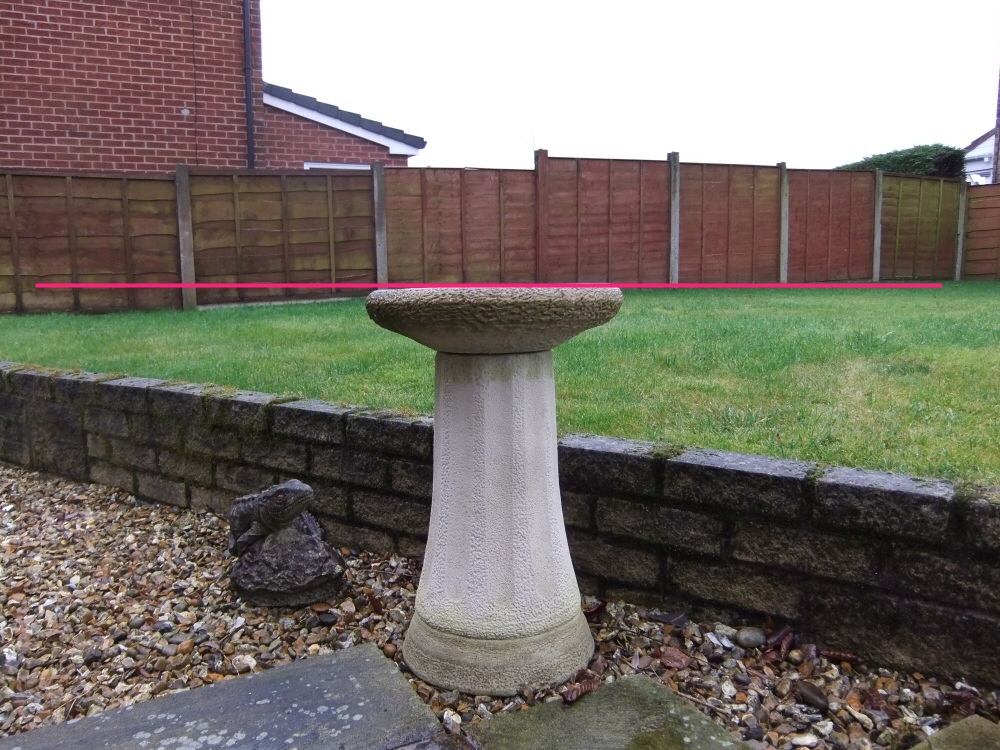
The first image has the eye level or view point on a level with the top of the “bath” (note the red line). Note also that the top surface is just a straight line…… no curve is involved as the “eye” is level with it.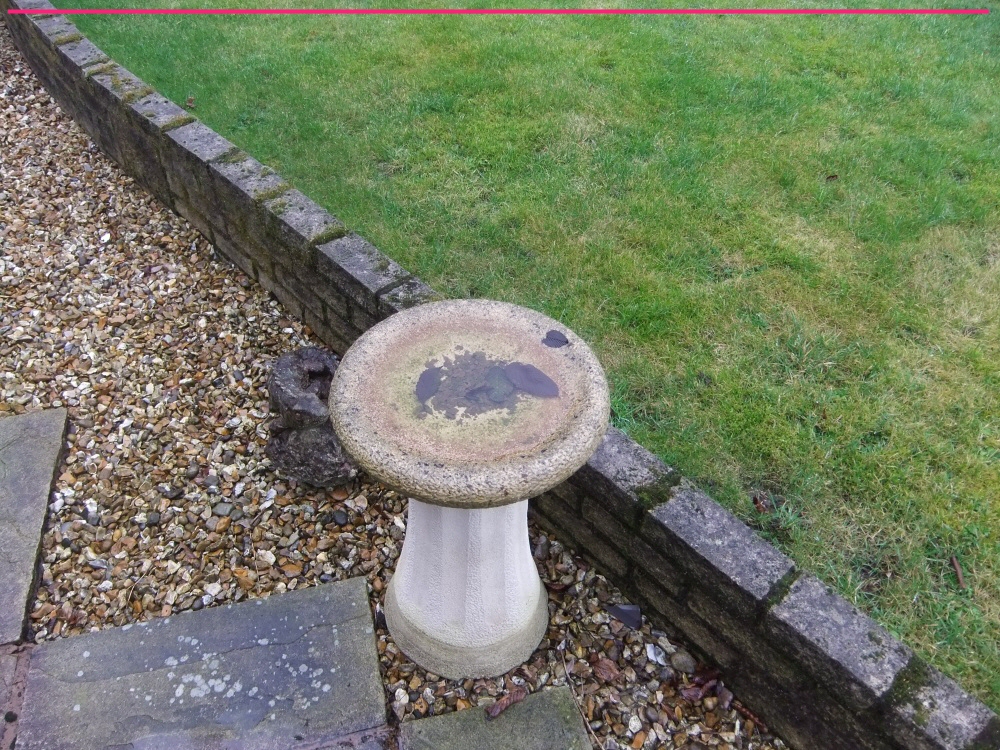 The second image shows the “bath” part to be quite circular because the viewpoint is clearly well above the subject. I have shown a red line here also but in truth the eye level is probably a lot higher than that. Remember that this “viewpoint” represents the position of the eye or viewer (or, as in this case, the camera) Note that the viewpoint would need to be directly above the bird bath for the top to actually be a circle rather than an ellipse.
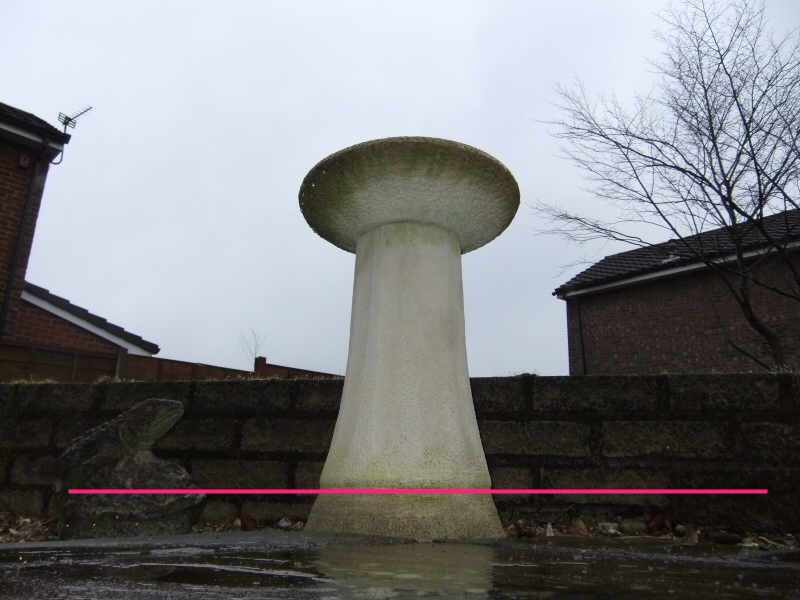
Lastly it’s self evident that the viewpoint is very near to the ground (note the shape of the very bottom of the bird bath…… almost a straight line as the viewpoint is very near to the same level as the bottom) Note also that we can now see underneath the “bath” as we have a kind of “worms eye view”…. And look how much form we can see at the top….. no straight lines any more.
The top surface was viewed as a straight line in the first of these 3 images because the eye level was level with it. Then we were high above that top surface and its shape apparently changed into an ellipse. Now we are so far below it that we see the underside as an ellipse and the very bottom of this sadly neglected bath looks almost straight as it is not very far below the eye level. Compare the bottom edge in the other views and note how they seem to have changed shape.
So it is important to note that the position from which a feature is viewed will impact on the shape that we will see and draw. This will include buildings, plant pots, wheels….in fact everything.
Note that the rules of perspective apply regardless of the viewing position or viewpoint but the resulting drawing or image will look very different depending on where it was viewed from. Look at the 3 different images below. Note that each is a sketch of essentially the same landscape but from different viewpoint and take particular notice of how each one differs from the others.
So it’s clear that the viewpoint for the image above is very high so that we can see over the top of the building and on to the horizon (ie eye level) Note that in this view we can see on top of the roof. In each of the three images that I will show here I have left in a few coloured construction lines to emphasise that each of them have been drawn in perspective (two point)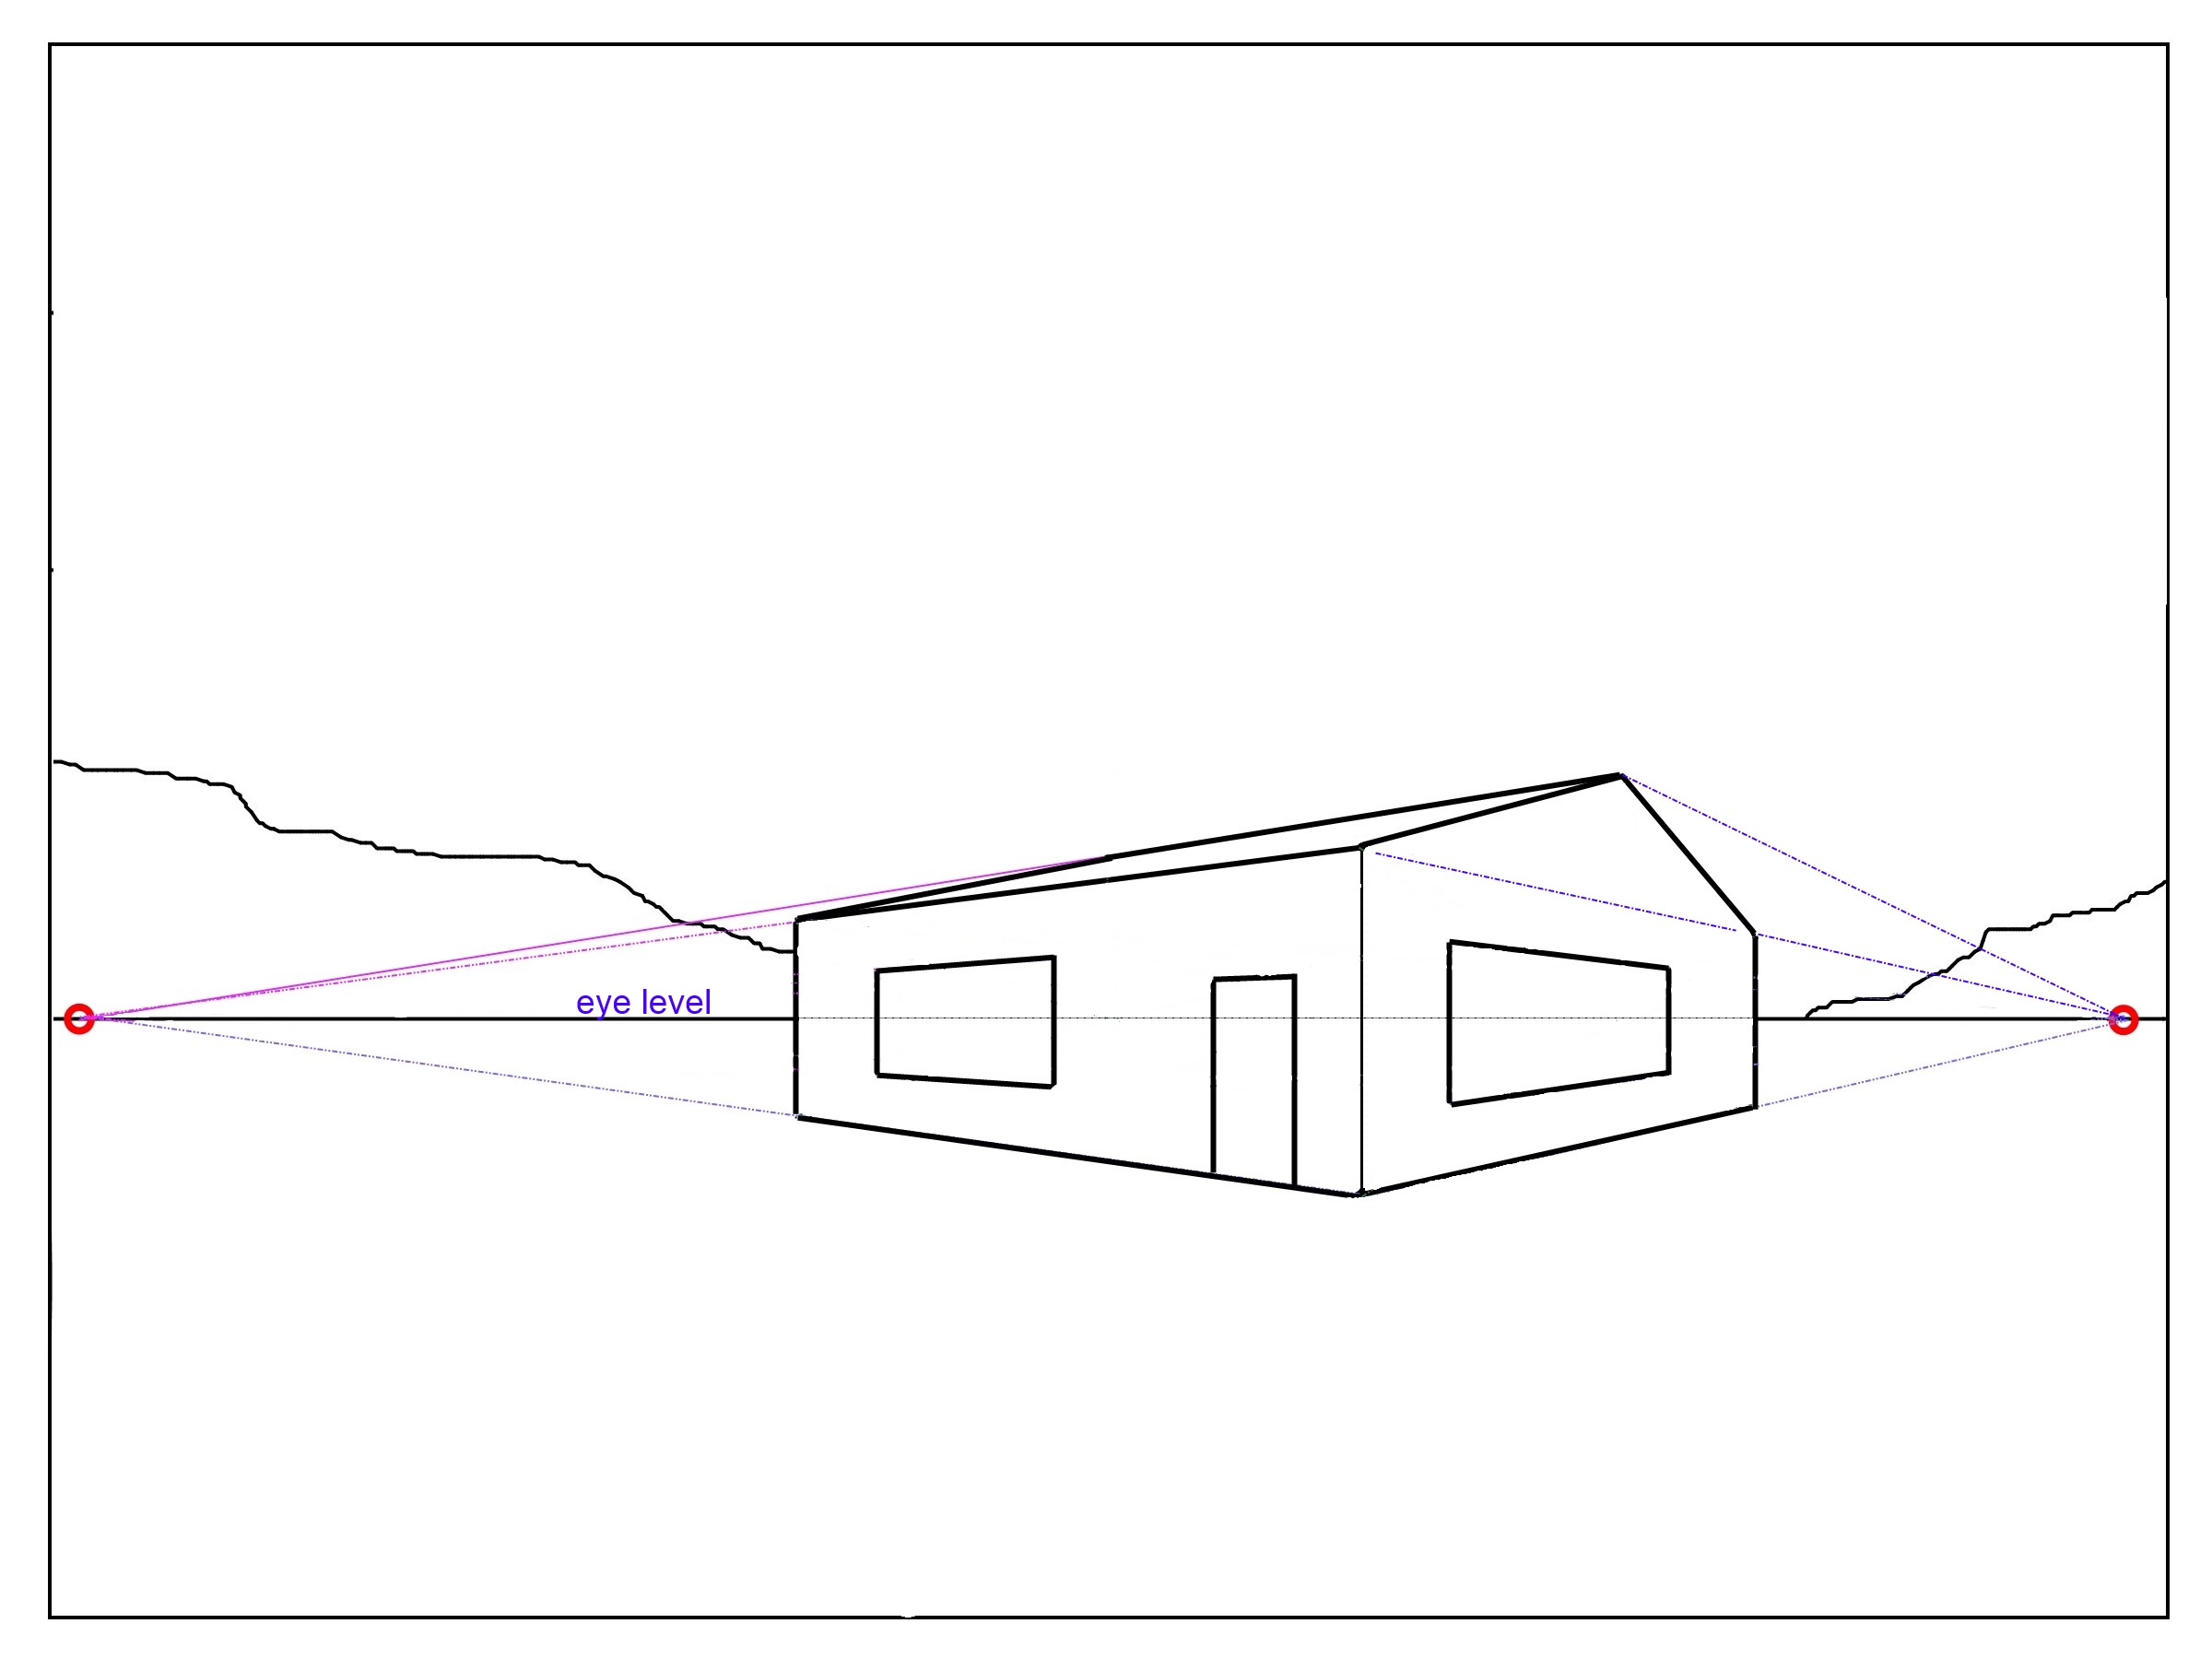 This image shows the eye level going through the building. What does this mean? Well, very simply that line that is annotated as “eye level” indicates that the viewer is almost certainly on a level with the building. This is because, as you can observe, the height of the eye level (or in reality, the viewers eyes) is in the position in the doorway that someone of average hight would be.
Note that we cannot see on top of the roof in the same way as the previous image. This is simply because our viewpoint is lower…….but what if our viewpoint were much lower? Imagine that we were looking up at a house on a hill.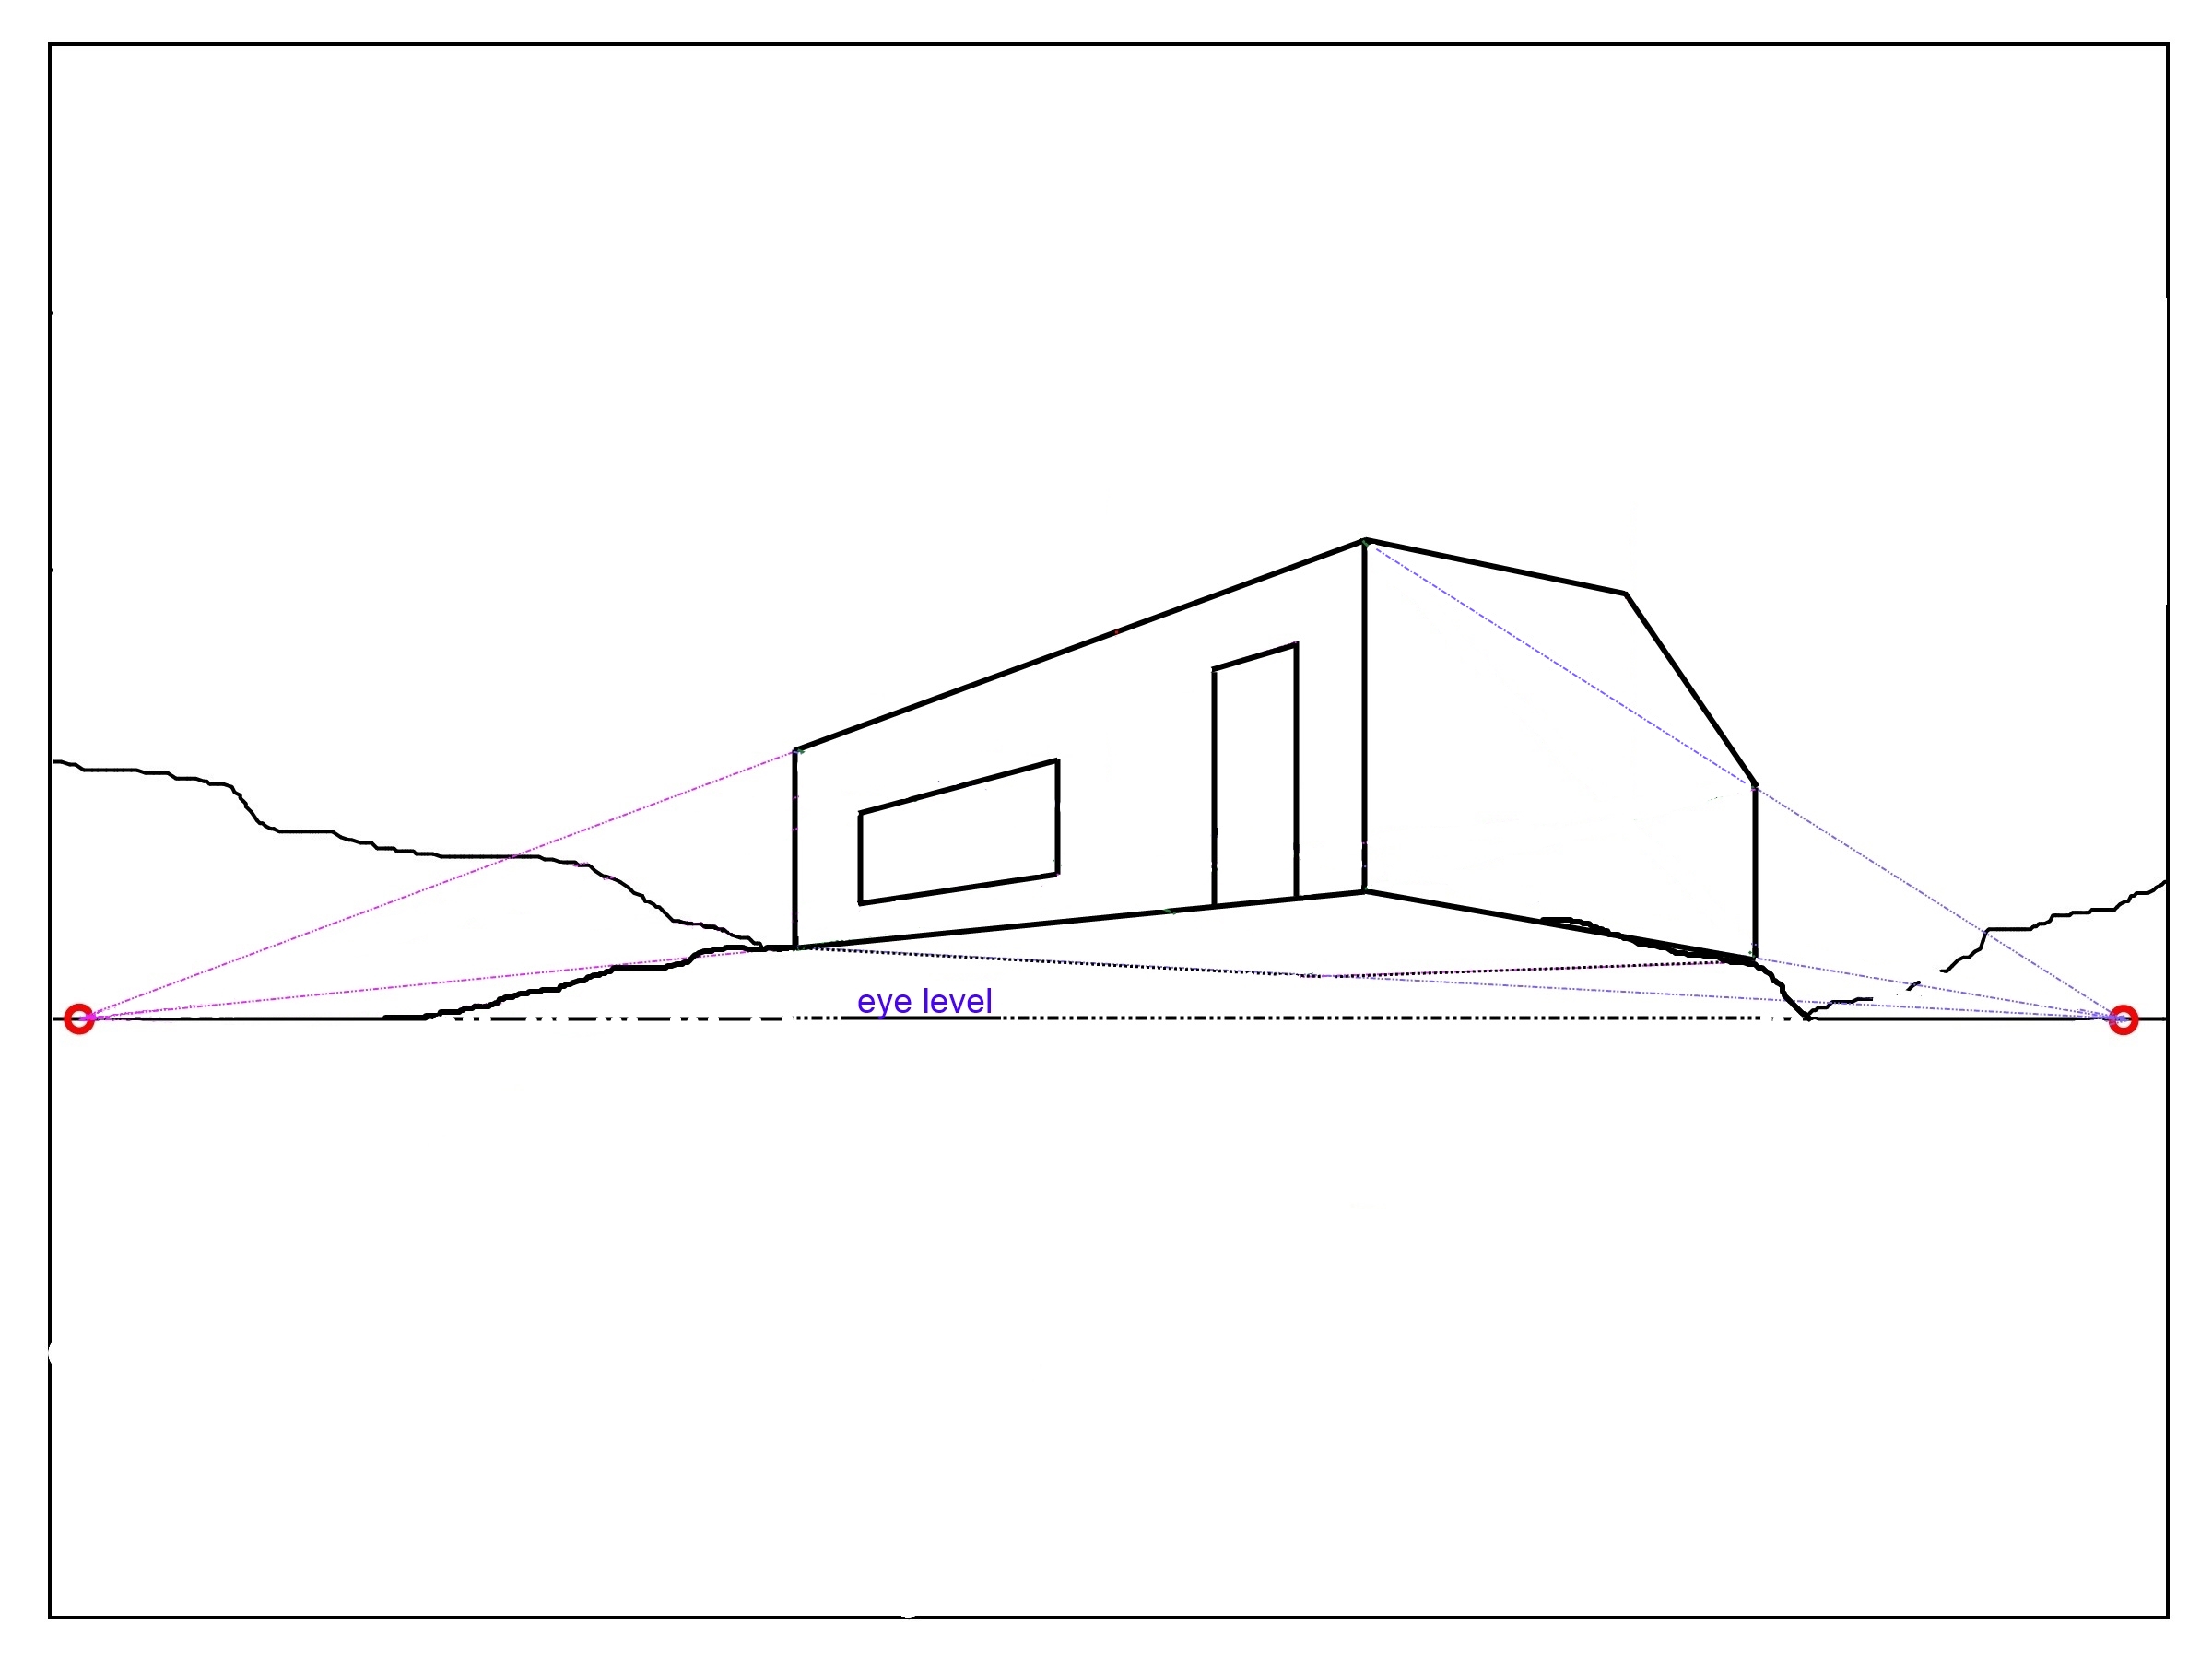 Look where the eye level is now. The viewers eyes are actually lower than any point on the building. Notice that we cannot see anything that is on top of the building now.
The problem is that we all already know this and our brain processes it in nano-seconds so that we can safely navigate our way through the physical world…… but…… analysing it sufficiently so that we might be able to imagine what a scene would look like from different viewpoints…….well, perhaps it can seem to be a bit more challenging.
I say “seem to be a bit more challenging” but if you follow a simple process it’ll actually be quite straightforward. At the risk of stating the obvious, you must first decide where the viewer was meant to be stood when viewing the scene that you are going to draw. In a photo that someone gives you (or you may have taken yourself) it’s usually fairly obvious where the viewer was stood, but if you are creating a drawing from your imagination then it become more important to be consistent with your viewpoint. For example, if you are drawing a scene that contains lots of plant pots then remember that the ellipses that represent the top part of the pots will all be similar. I have drawn a couple of examples shown below.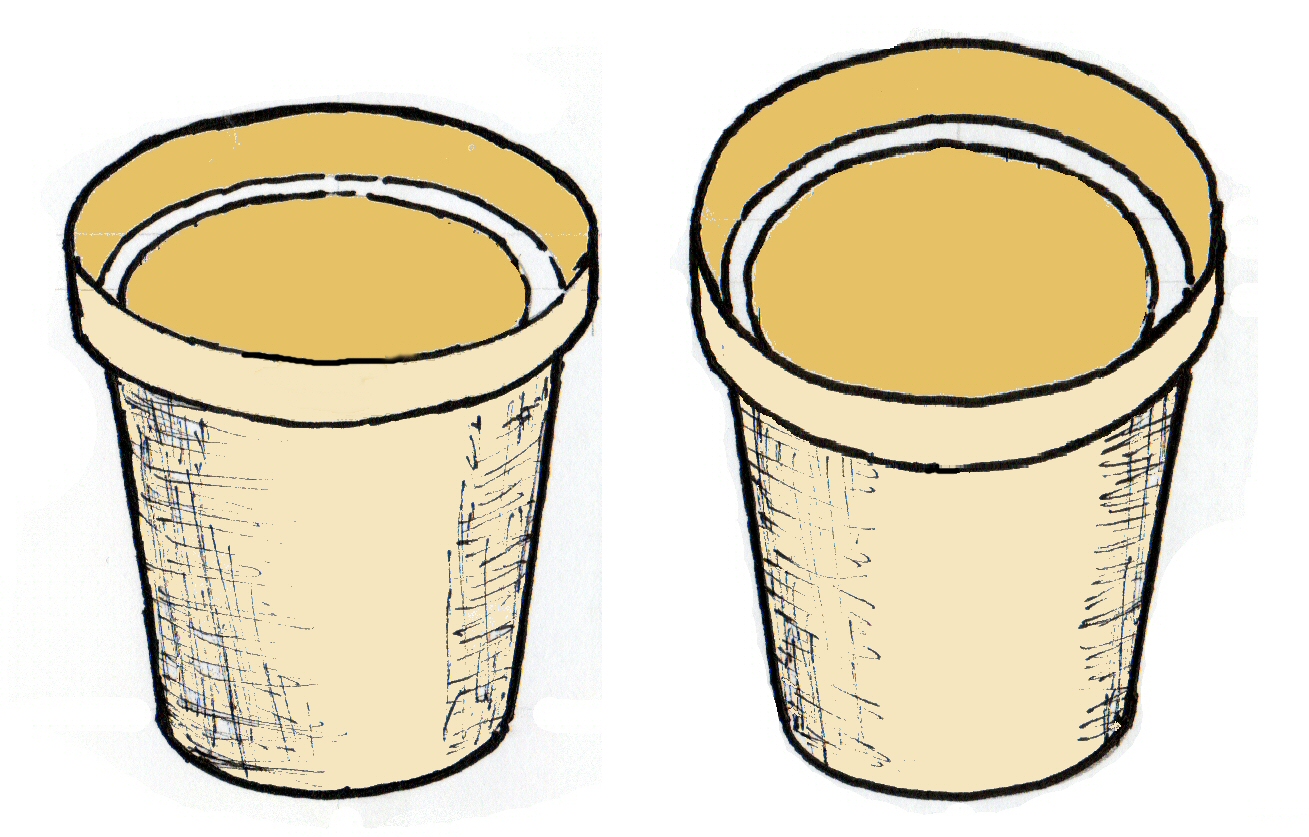 In the example above we can see two plant pots. The one on the left is drawn correctly in that the ellipses at the top of the pot are in the same elevation (or taken from the same viewpoint) as the ellipse shown at the bottom of the pot. In contrast the plant pot on the right isn’t correct. I’ve tried not to exaggerate the effect too much but it’s clear that not only do the ellipses at the top not match those of the pot on the left but they are also at odds with the ellipse at the bottom of the pot.
The pot on the right is incorrect in that although it is meant to have been drawn from the same viewpoint as the one on the right it looks as if it’s actually been viewed from a much higher point. Note how the ellipse on the right hand pot is much rounder. The only way that can be achieved is to look from a higher position. So….since both pots are meant to be sitting on the same horizontal surface (ie one hasn’t been tipped over toward the viewer); then both plant pots should look the same, as shown in the image below.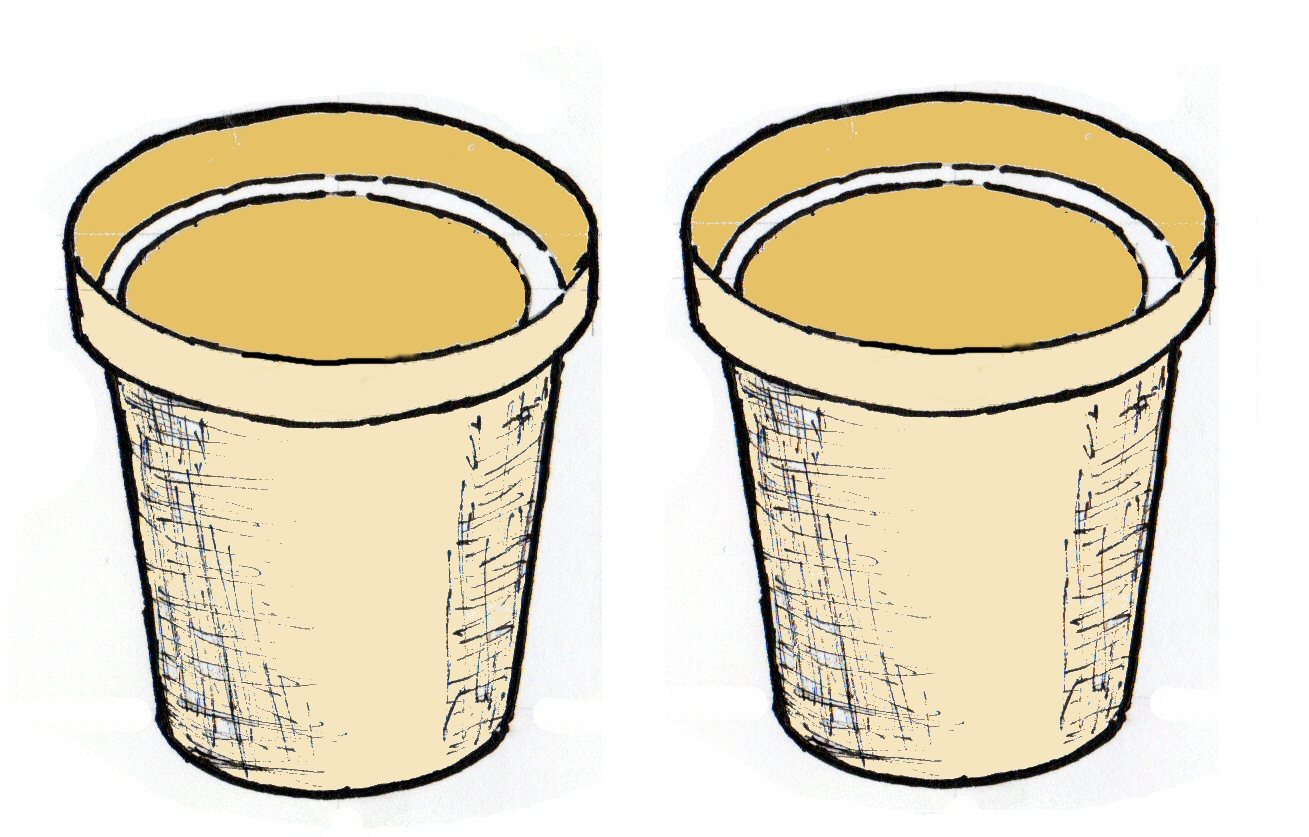 So remember to decide on a viewpoint and ensure that you have created a drawing that shows all items in the scene from that same viewpoint.